We have lived in our house for 5 years, and I absolutely HATE the ceramic tile in our house. We had it in the laundry room, kitchen, and in a little area in our family room from the laundry room to the steps into the kitchen. It was the oddest thing since the steps had carpet on them. Since we redid our family room the ceramic tile in the family room and laundry room is gone. When we had the carpet installed in the family room our flooring contractor spent HOURS pulling up the ceramic tile in the laundry room (including all the layers between and underneath) and replacing it with a cushiony linoleum. It was important to have that bit of cushion since the subfloor in the laundry room is concrete.
Like most things in our house the ceramic tile was installed improperly. Over the old linoleum tiles over old linoleum, they placed subflooring by nailing it into the concrete floor underneath. Then they just put the ceramic right on top-no backerboard. I don’t know if it’s just what materials were available to a DIYer in the ’90s, but it’s a mess.
After the family room remodel we still have the ceramic tile on the kitchen floor, and I want it to go so bad, but the kitchen needs a LOT of help. When we moved in we did some work (new DEEP sink which I love, new cooktop, etc.) and a bit more work in the meantime, but most of the kitchen just needs to go. Since we also hate the layout we know a remodel is down the line, but it’s not going to be cheap if anything else in our house is any indication. Most likely it will involve a complete gut job, including the walls. (the cabinets are AWFUL) Not something even a motivated and fairly handy DIYer can take on without a hefty budget in place.
So, I’ve been living with it, and the ceramic tile is just one of those things I try to ignore. The grout on the tile was SO gross. I scrubbed it down when we moved in, and in the 5 years since a number of times, but it still gets dingy and gross after a few months. Like most things I just had it one day and decided it was time to do SOMETHING.
That’s where Grout Renew comes in. I saw it on the shelf at Home Depot a few months ago, but finally decided to give it a try this weekend while the kids and my husband went away for the weekend.
Supplies for cleaning and using Grout Renew:
For Cleaning:
- bucket with water and cleaner for grout
- scrub brush (you don’t need a grout specific one)
- soft scrub with bleach
- Clorox bleach pen for stubborn stains (look in the laundry section for this)
- LOTS of paper towels and rags
- a towel or mat to sit on
For Grout Renew:
- Grout Renew in your choice of color (comes in shades from white to dark browns and grays)
- soft toothbrush (get several just in case)
- cotton swabs for small areas such as near the cabinets or baseboards
- container of water and rags/paper towels to wipe up excess product
- trash can or bin for used rags/paper towels
- a towel or mat to sit on
Cleaning Process:
I started with scrubbing the grout with a scrub brush (I just used one I had on hand, but they cost about $1-2 at Target, more if you want a fancy handle). I’m all for natural cleaners, and use them regularly, but nothing cleans grout like bleach, and trust me I’ve tried everything. Instead of using straight up bleach I prefer to mix a couple of squeezes of soft scrub with bleach into hot water (just enough to cover the bottom of the bucket). It’s easier on your hands, and doesn’t have quite the strong odor bleach does. I am not making a paste, I’m simply adding a bit of scrub and bleach to the water to help clean the grout.
You’re also going to need a few other things. A towel to sit on since ceramic tile is literally a pain in the tush, and a LOT of paper towels or rags. You do not want to keep these, so you want something you can toss when you’re done. The foulness that comes out of the grout will shock you. If you use paper towels be sure to get a thicker brand (I like Bounty), those flimsy paper towels won’t hold up well. Any stubborn stains can get soft scrub or a Clorox bleach pen applied directly to the stain. Let it sit for a bit before you scrub. Of course you’re going to be emptying your bucket a LOT, and refilling since you won’t want to spread dirty water around.
Then you start scrubbing. And scrub some more. And scrub some more. You’ll probably want to break this into sections to give your hands a break, and it’s preferable to do this when no one is around to run on the floor since ceramic tile + water= slipping and falling.
Once everything is scrubbed, give it a at least a few hours to dry out. You’ll want to vacuum and dust mop the floors before you start using the Grout Renew just to make sure everything is clean and dust/dirt free.
How to Use Grout Renew:
Now it’s time to get out your Grout Renew. It comes in a variety of colors, and based on my experience if you want a medium toned grout go darker. The product came out lighter than I expected on our floor.
The directions are on the bottle but it’s pretty simple. You shake the bottle well, and then you’ll pour Grout Renew into/on a plastic bowl of plate. You can use disposable ones, but I used an old Ikea kid’s bowl we use for craft paint. Using a soft toothbrush you’ll get some product on your brush and dab it into the middle of the grout line. Now you just rub gently back and forth to spread it out along the grout line. Start with very little, and you’ll get the hang of how much you’ll need. After you’ve painted the product on you’ll want to get a damp rag to gently wipe up any spills or product that got onto the edge of your tile. Since it dries quickly it’s imperative that you do this within a few minutes of putting the Grout Renew on. Once it’s dried it’s much harder to get off. Now, you just repeat the process until you’ve done the whole floor, going back to touch up any spots you missed at the end. If you’re grout lines are smaller (meaning you have smaller tiles) it may be better to go with a pre-mixed grout to touch up your floor.
Here’s a quick video to show you how it works:
A few notes:
-take your time at first, once you get the hang of it you’ll move a little faster
-take regular breaks since it’s such tedious and mind-numbing work
-keep supplies next to you including (just move them as you go):
- Clorox bleach pen for stubborn stains
- cotton swabs for small areas such as near the cabinets or baseboards
- container of water and rags/paper towels to wipe up excess product
- trash can or bin for used rags/paper towels
-make sure you use a soft toothbrush only, I tried a medium one and it didn’t work as well
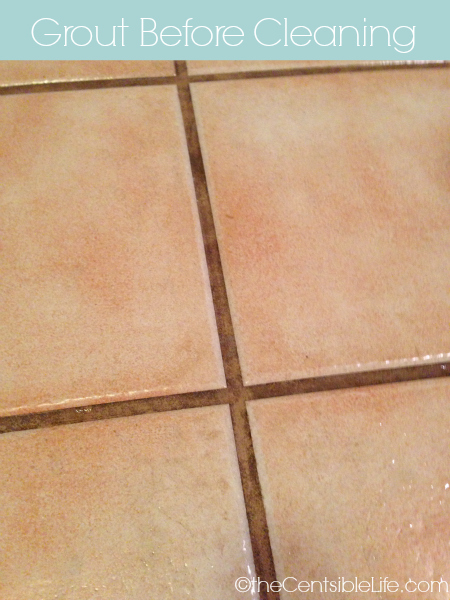
Here are the before and afters.
Before cleaning (WARNING: this is GROSS)
Even with regular cleaning the grout always went back to being discolored.
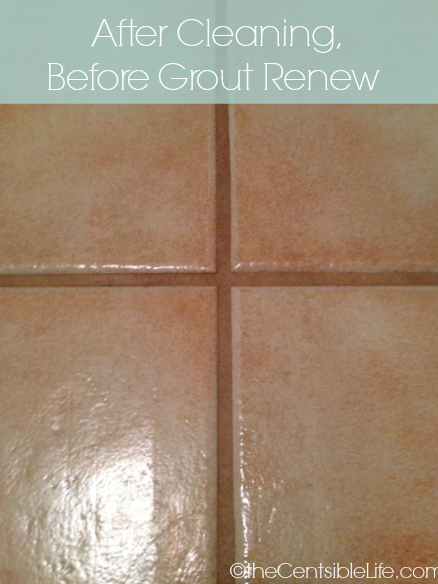
After cleaning/Before Grout Renew:
After cleaning and Grout Renew

It’s like having a totally new floor! Every time I look at it now I smile instead of dreaming of ripping it out. I may even keep the tile when we remodel the kitchen since it looks so good now. I’m still toying with the idea of going over it with a darker color. I used Haystack and it dried more gray than tan, but for now I’m giving my hands (and my tush!) a break.
Additionally I had to fix the thresholds from our kitchen to the hallway and dining room, and found that there was a gap in the grout after I put on the new thresholds. I picked up some pre-mixed grout in the same color from Home Depot (it should be in the same aisle you found Grout Renew) to patch those gaps.
The Grout Renew costs just under $12 for a bottle, and you our 10 by 16 kitchen only needed a small portion of the bottle, so this is a super affordable way to renew your floor.
Update: Some folks have asked how this has held up, and 6 months later it still looks the same! We didn’t seal it (the product doesn’t call for that). Regular cleaning with mild floor soap or a steam mop have no impact on the grout. Occasional spills (including nasty ones like ketchup and smushed berries) that wear on the grout did nothing to the finish. I can’t highly recommend this product enough!
Kelly
Don’t miss a single post! Subscribe to my RSS feed or sign up to have my posts delivered to your email.


Pingback: The Diary of Mrs. Match | Kitchen Grout Makeover