I don’t know about you, but the last week of school before summer vacation there is a seemingly endless stream of paper coming into the house, between the artwork, the writing assignments, projects and notebooks. At the end of each school year I like to go through the art in particular, photograph (or scan it) and then order hardcover books, such as the ones from Shutterfly. I choose about 2 dozen pieces of work from each of the kids to put in the books and then everything gets recycled.
Sometimes though a piece of art is just so special that I want to create something with it that will leave a lasting memory.
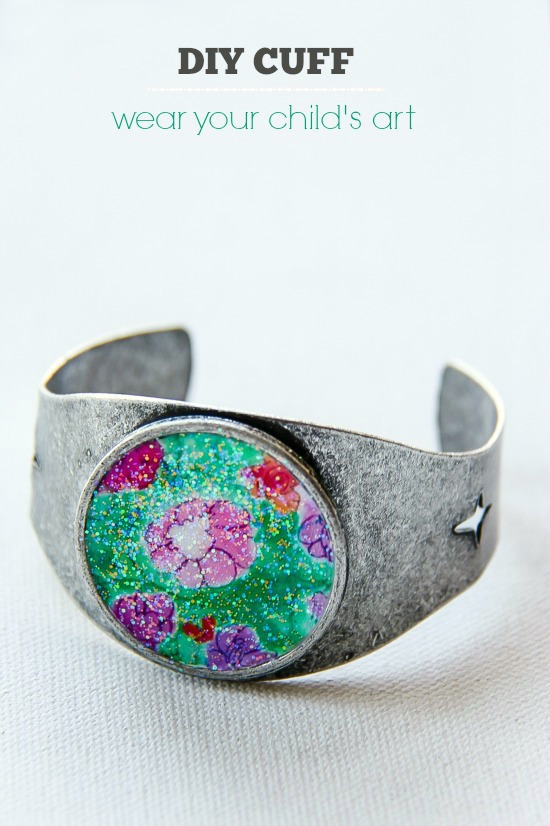
Marisol painted a beautiful picture for me at school for Mother’s Day this year. I immediately set it aside from the piles of art and assignments until I could decide exactly what I wanted to do with it.
And in the middle of the night it came to me. I’d make jewelry.
This is the piece of art she created for me.
I headed to Michael’s craft store the next day knowing that I had seen a cuff or pendant there previously that I could fill with art, and sure enough in the jewelry section I found it. The cuff was originally $3.99, but I had a 50% off coupon bringing the price down to $1.99. What a bargain!
This is what you will need to make this cuff:
- A cuff - get one from a crafting store that has a space to add embellishments (like the one pictured above that I used)
- Art from your child
- E-6000 glue
- Mod Podge - I had a glitter Mod Podge that I’d been dying to try so did use it for this project, but you can use a regular one too.
- Computer, printer and photo paper
Photograph or scan your child’s art and put it on your computer. I used PicMonkey (there is a free and paid version) to edit the photograph to the correct size and shape. You could do the same thing with other photo editing programs too, but if you are interested in how to do it with PicMonkey, this is the tool I used.
It’s located under Themes - School U - Class Cutups. You can edit the background to white, adjust the size of the cutout and move it around on your picture until you get it in just the right position. Then use the resize tool under Basic Edits to reduce the size of the image.
Print your image, cut it out and then using the E-6000 glue adhere it to the cuff. Let it dry, then apply two coats of Mod Podge over the top to protect it, allowing each coat to dry thoroughly.
And there you have it a lovely way to display your child’s art and carry it around with you.
Tonya
I LOVE this project, Tonya. What a great idea! Also, GLITTER mod podge?!
Sweet idea! Looks beautiful!
THIS is fabulous!!!! Heading to Michael’s today and going to pick a cuff up!
Thank you Brandi
Would love to see your version!
Lorette Lavine says
What a wonderful idea! This made me teary to see what you can do with imagination and kid’s art. My granddaughter’s art is fabulous at least to me. Thank you.
Tonya is the best! I love this idea.